
Adding Entra ID Single Sign-On to the EIDO Digital Platform
This article is aimed at IT and Entra ID administrators.EIDO supports federated authentication through SAML 2.0 with the Entra ID platform (formerly Azure AD). The authentication federation service is provided by Amazon Cognito as the intermediary between the EIDO Digital Platform and the Entra ID platform.
Adding Entra ID Single Sign-On (SSO) to the EIDO Digital Platform involves the following steps:
- Create a SAML 2.0 application in Entra ID
- Send the metadata to EIDO Support
- Configure roles for the application
- Add users and test the application
EIDO’s support for Single Sign-On is flexible, and can be configured in a variety of ways to suit your organisation’s needs.
A typical configuration is:
- 2 Entra applications (one for Sandbox, one for Production)
- Each application is connected to a single organisation in the EIDO Digital Platform
- Users are identified by a single domain through their email address
More complex configurations, such as multiple organisations, multiple domains, or multiple identity providers are also supported.
1. Create a SAML 2.0 application in Entra ID
Log in to the Entra ID portal as an administrator with permissions to create new applications.
Navigate to the “Enterprise applications” section.
Click “New application” and select “Create your own application”.
Enter a name for the application, such as “EIDO Digital Platform (Sandbox)”.
Once the application is created, navigate to the “Single sign-on” section in the application settings.
Select “SAML” as the single sign-on method.
Click “Edit” in the “Basic SAML Configuration” section, and enter the details for your chosen environment (Sandbox or regional Production) from the list below:
Sandbox
Field Value Identifier (Entity) urn:amazon:cognito:sp:eu-west-2_yHCkcFYkuReply URL (Assertion Consumer Service URL) https://eido-user-pool-sandbox.auth.eu-west-2.amazoncognito.com/saml2/idpresponseUK Production
Field Value Identifier (Entity) urn:amazon:cognito:sp:eu-west-2_DdDqpugJeReply URL (Assertion Consumer Service URL) https://eido-user-pool-prod.auth.eu-west-2.amazoncognito.com/saml2/idpresponseAustralia Production
Field Value Identifier (Entity) urn:amazon:cognito:sp:ap-southeast-2_MvW4rHmEjReply URL (Assertion Consumer Service URL) https://eido-user-pool-prod.auth.ap-southeast-2.amazoncognito.com/saml2/idpresponse
Click “Save” to save the configuration.
2. Send the metadata to EIDO Support
Now that the application has been created and configured in Entra ID, the next step is to send the metadata to EIDO Support. This metadata is required to configure the EIDO Digital Platform to trust the Entra ID application.
In the “Single sign-on” section of the application settings, click the “Copy” button next to the “App Federation Metadata Url” link:
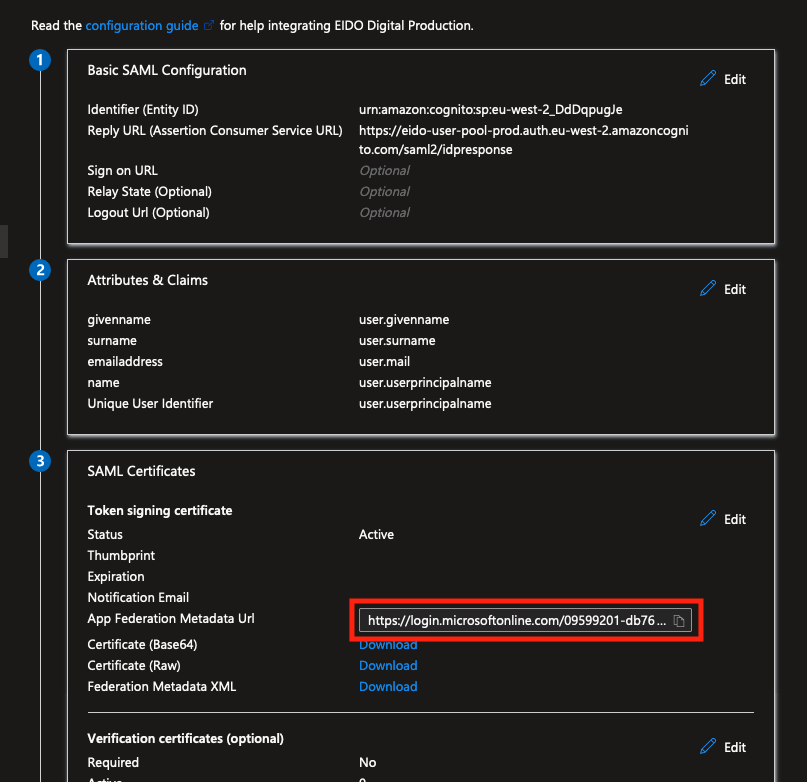
Send the copied URL to EIDO Support, along with the environment (Sandbox or Production) and a list of domains to associate with this Identity Provider, and any other relevant information (such as whether multiple organisations are required).
EIDO will then aim to deploy the new connection within 5 working days.
In the meantime, you can continue to configure the application for users and roles using the remaining steps in this article.
3. Configure roles for the application
EIDO uses the native Entra ID roles claims to determine the correct permissions for users authenticating via SAML. This means that the roles for the application must be configured and managed in Entra ID.
To set these up, follow these steps:
In the Entra ID portal, navigate to the “App registrations” section.
Under “All applications”, find the application you created in the previous step and click on it to open the application settings.
Navigate to the “Manifest” section.
In the manifest JSON, locate the
appRolessection and replace the existing roles with the following:"appRoles": [ { "allowedMemberTypes": [ "User" ], "description": "Read-Only Users cannot perform any updates or deletions, but can view patient information, reports, and custom procedures.", "displayName": "Read-Only User", "id": "85b77518-4499-4baa-9d3f-076490d21960", "isEnabled": true, "lang": null, "origin": "Application", "value": "read_only_user" }, { "allowedMemberTypes": [ "User" ], "description": "Library Users can create, update, and delete custom procedure library content, but have no patient-related permissions.", "displayName": "Library User", "id": "7fb097e3-55ad-4154-a361-c26d9b1d2981", "isEnabled": true, "lang": null, "origin": "Application", "value": "library_user" }, { "allowedMemberTypes": [ "User" ], "description": "Dashboard Users have can create, update, and delete patients, custom procedures, and can create and update consent sessions.", "displayName": "Dashboard User", "id": "75685057-1509-47b0-82de-a17d9b47dd13", "isEnabled": true, "lang": null, "origin": "Application", "value": "dashboard_user" }, { "allowedMemberTypes": [ "User" ], "description": "Dashboard Administrators have full administrative privileges to the organisation's portal.", "displayName": "Dashboard Administrator", "id": "9a296ca7-424b-468a-8f3b-24dd3a287d16", "isEnabled": true, "lang": null, "origin": "Application", "value": "dashboard_admin" } ],Note: Entra may complain that roles which are in use must first be disabled. If this occurs, simply set the existing roles
isEnabledproperty tofalse, save, and then replace theappRolessection with the new roles as above.Please also note that if you would prefer to use different role names, or are only using a subset of these roles, you can remove or disable any which are not needed.
Click “Save” to save the changes.
4. Add users and test the application
Now that the application and roles have been configured, the final step is to add users to the application and test the SAML authentication.
- In the Entra ID portal, navigate to the “Enterprise applications” section.
- Under “All applications”, find the application you created in the previous steps and click on it to open the application settings.
- Navigate to the “Users and groups” section.
- Click “Add user/group” and select the users or groups that should have access to the application.
- Select the role which should be assigned to the user or group, and click “Assign”.
Once users have been added to the application, and EIDO has confirmed the configuration has been deployed, you can test the SAML authentication by navigating to the application and selecting the “Login with Microsoft” button.
If you encounter any issues, please contact EIDO Support for assistance.