
Custom Information Articles In Depth
This article is an in depth look at the updated Custom Information Articles library.
Contents
- Interface Tour
- Options Tab
- History Tab
- Draft Tab
- Images and Videos
- Saving and Publishing
- Showing content on the consent form
- Translations
- Preview
- Send to a patient
- Import & Export
- Rollback
Interface Tour
The custom information article section is a full content management system, to create, edit and publish information for patients.
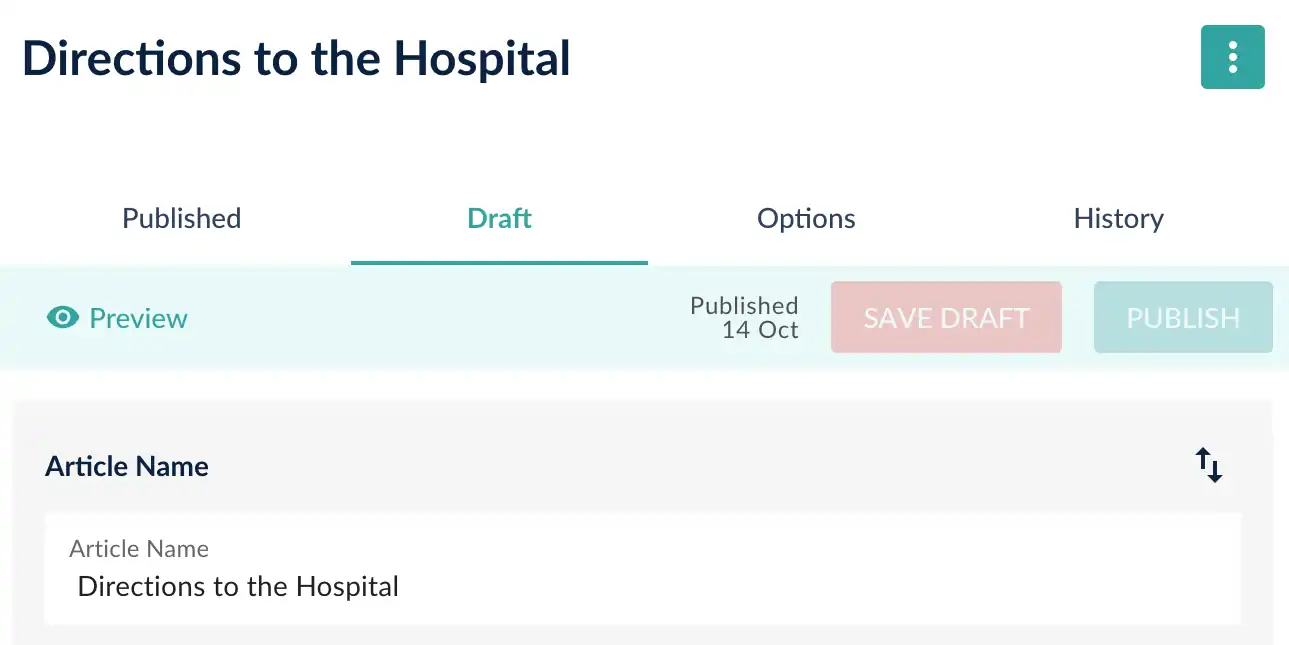
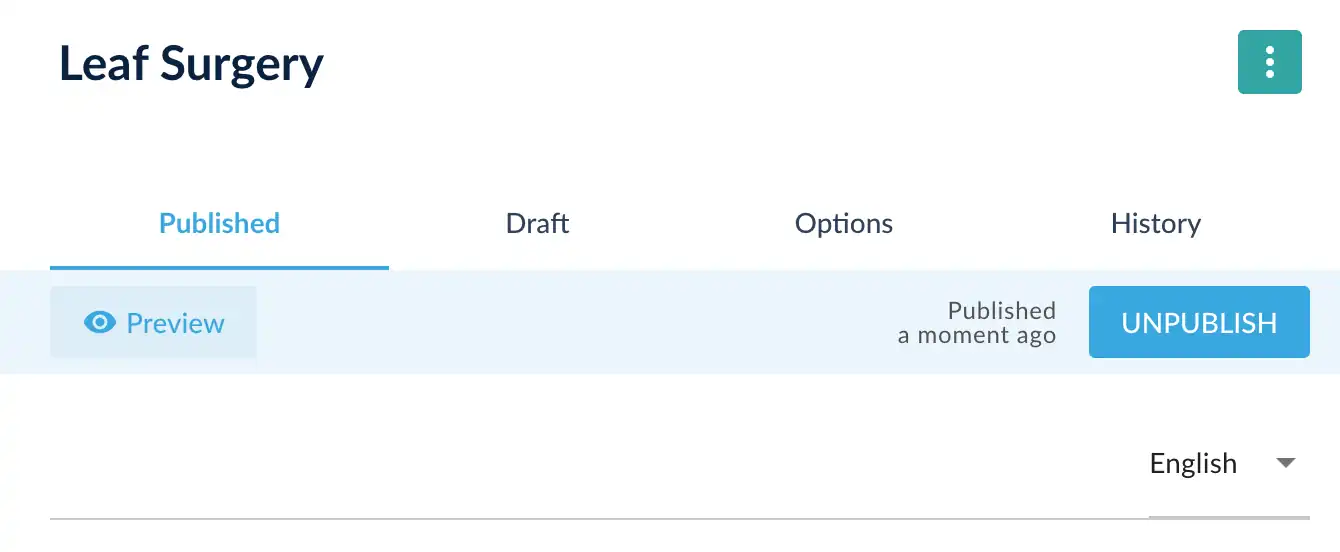
The interface has four tabs across the top. To create and edit content, you use the Draft tab. This shows the very latest version of your article.
The Options tab has all the configuration for the article, from Laterality to Expiry dates and internal version numbers.
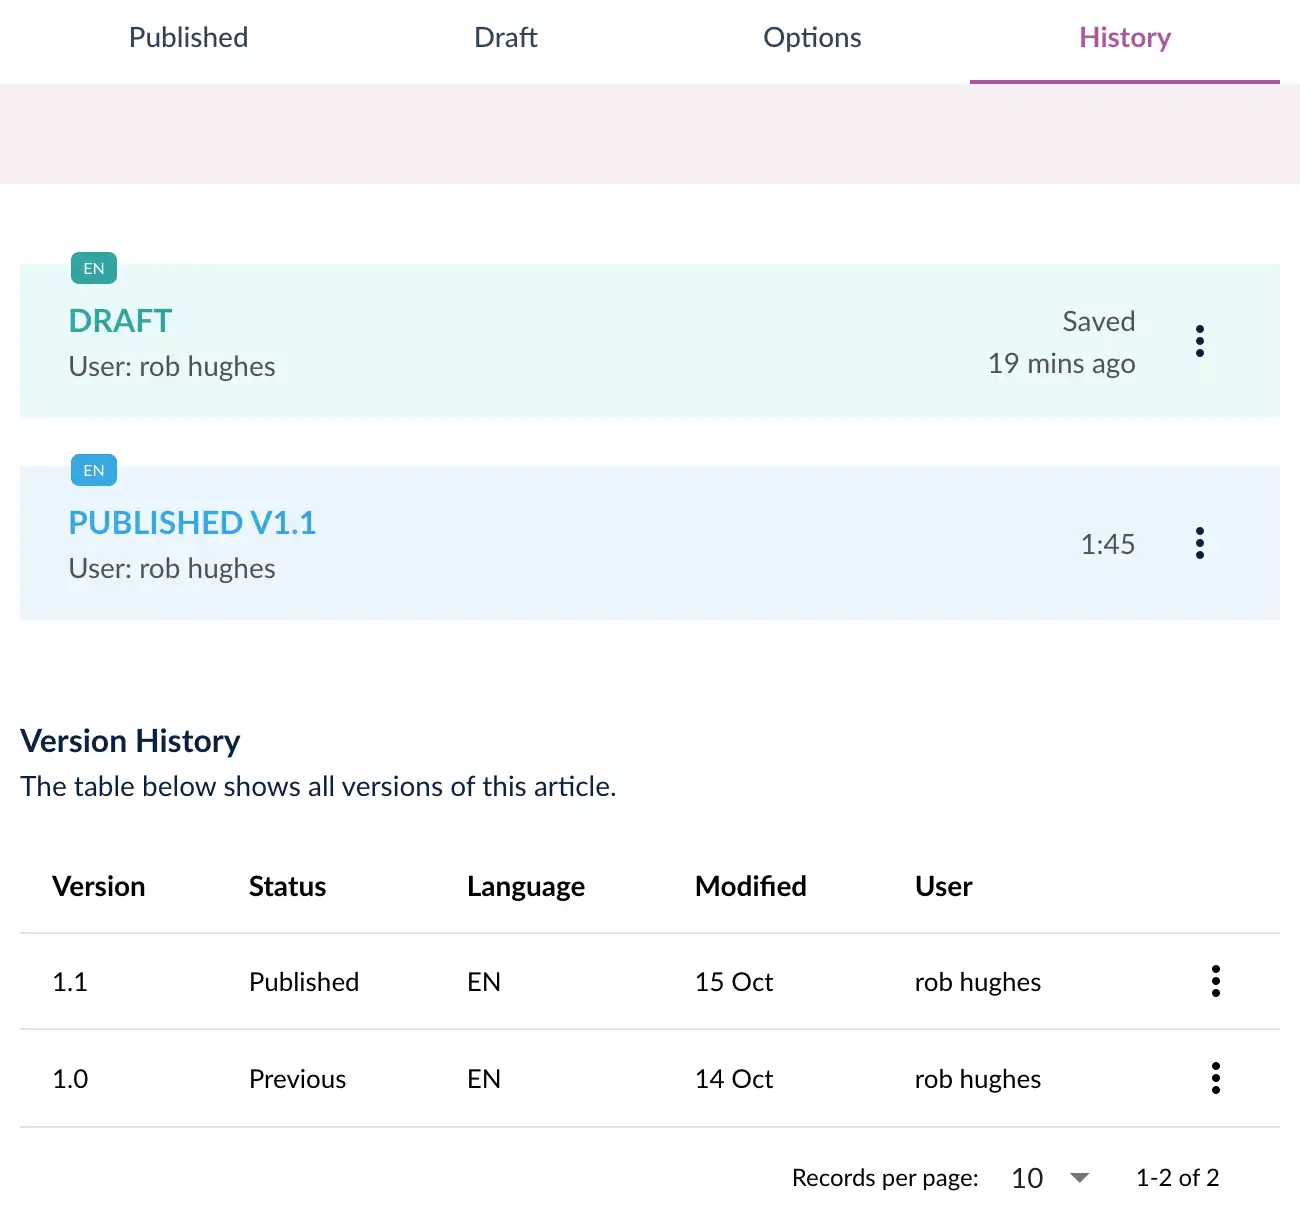
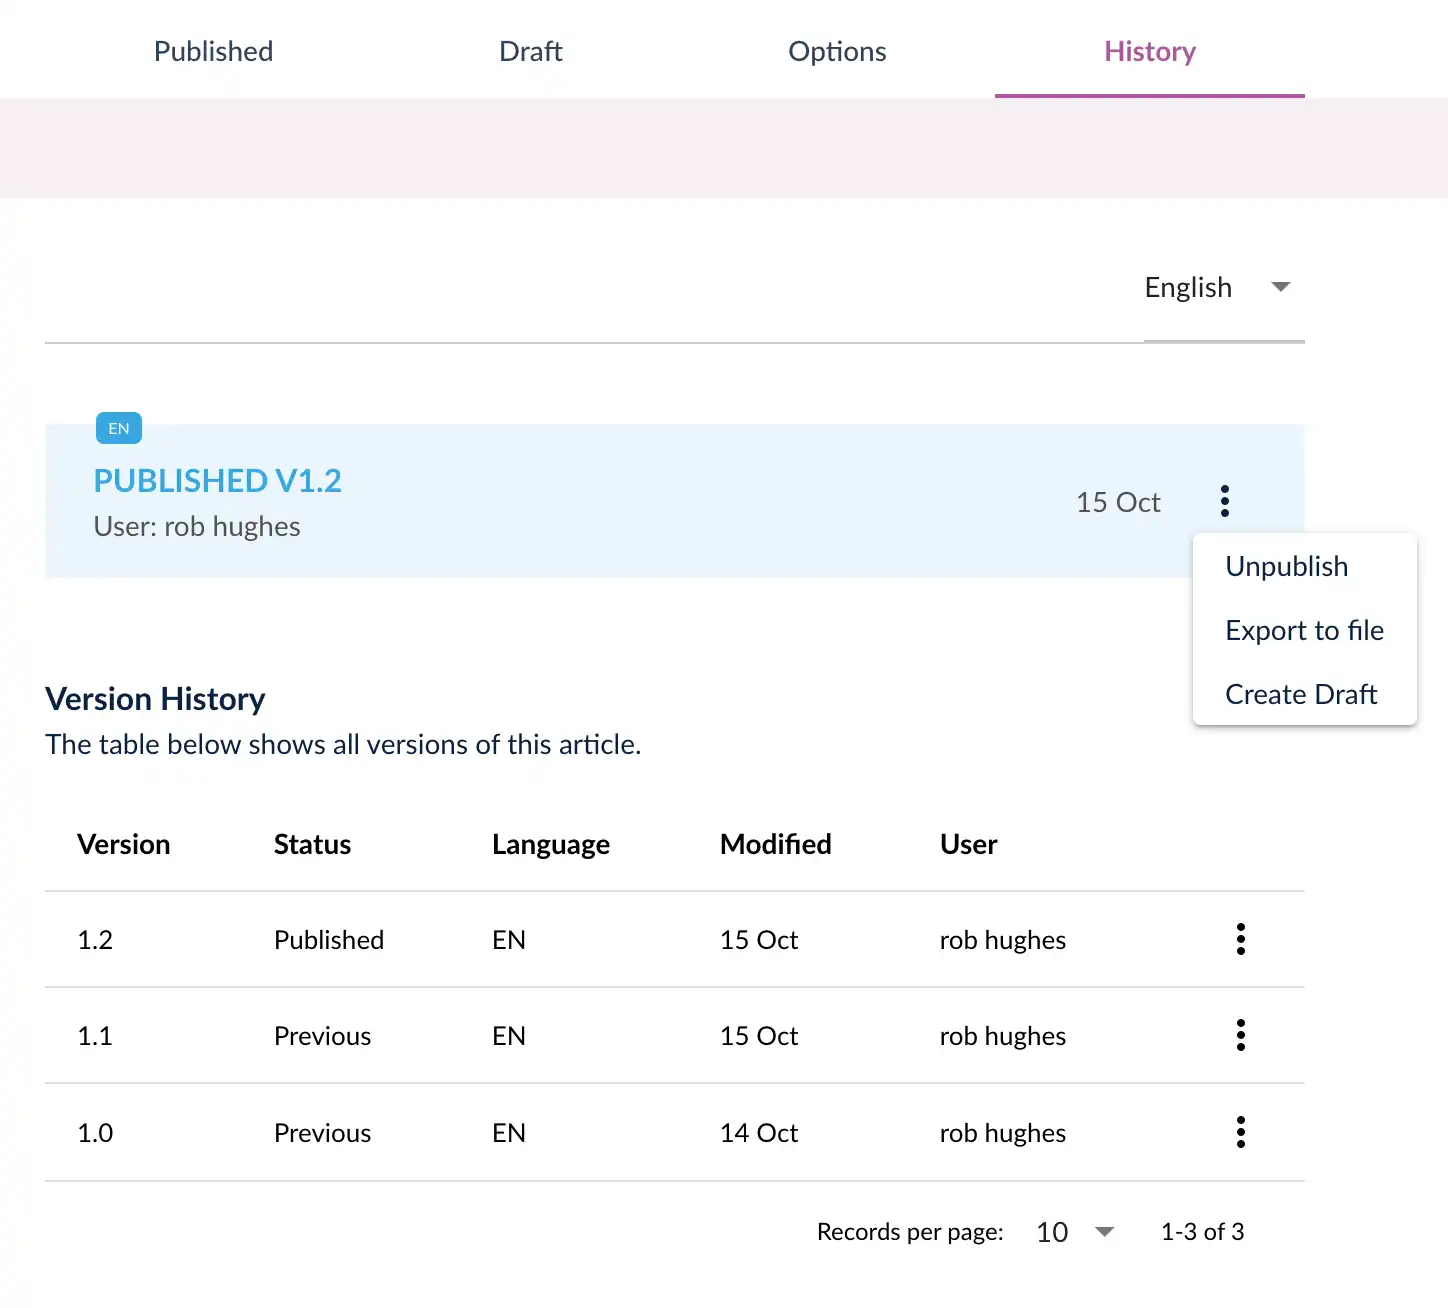
History shows who changed this article and when.
Published will show the current live article, which patients will see.
Options Tab
The options tab controls the settings for the article.
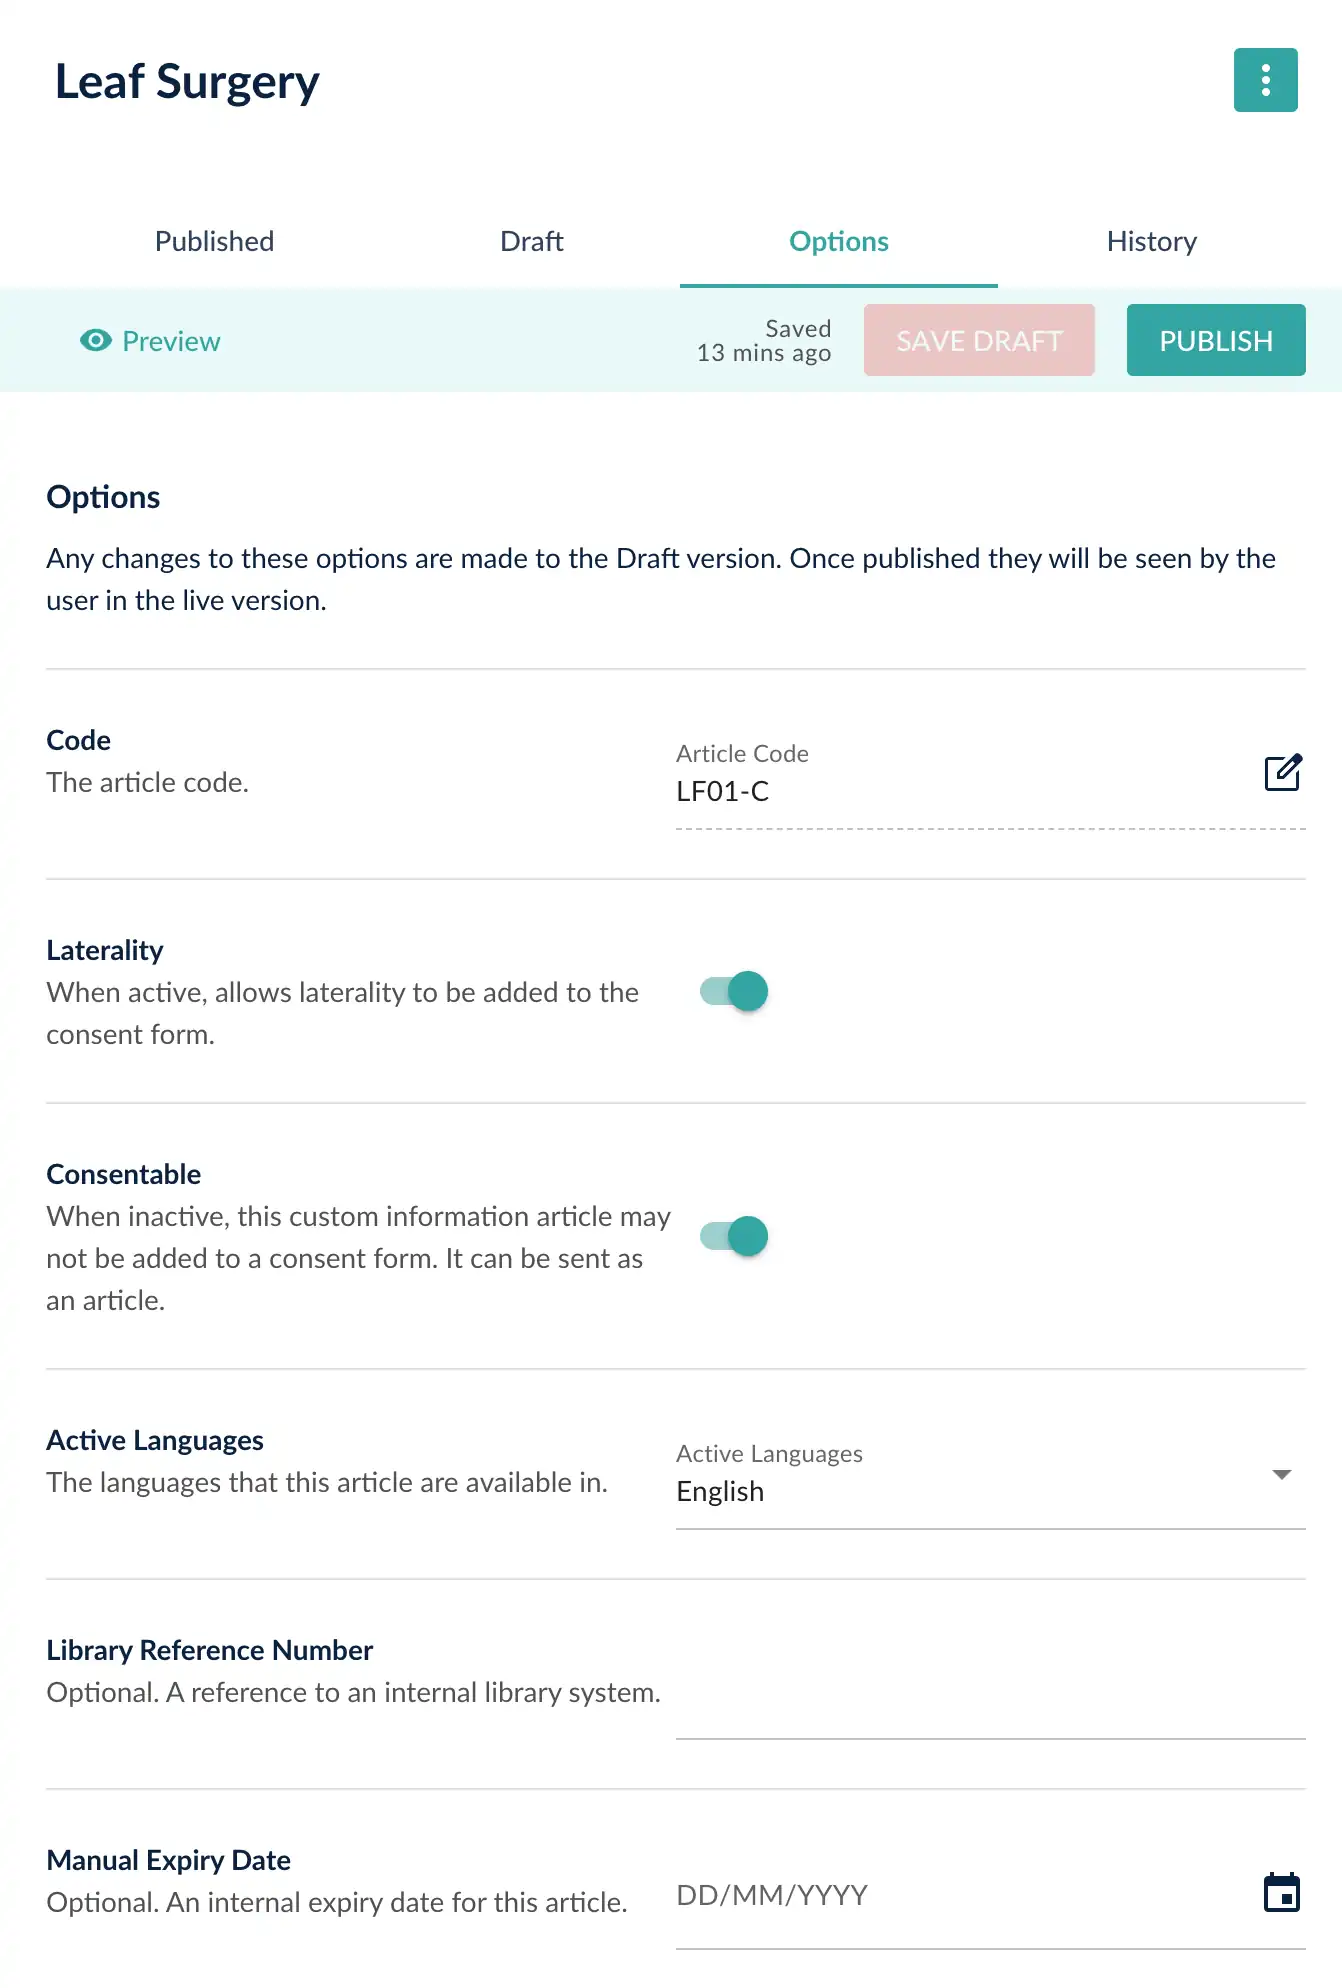
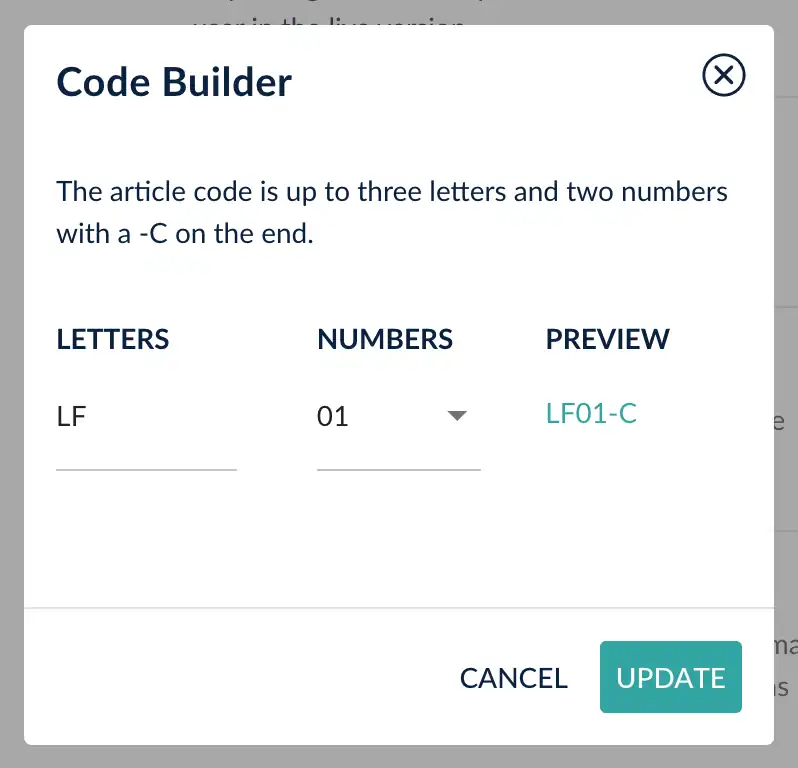
Code The article code can be used as a reference, but also in search.
Select the edit icon and a screen opens. The code is made up of letters and numbers.
In the first box, 1 to 3 letters can be added. Then a two digit number. A ‘-C’ is always added to the end to indicate a custom article.
For example EM01-C could be an emergency article, or PLA01-C for plastic surgery.
The codes are fully in your control. You can match to departmental codes, or define a specific custom article code.
Laterality This is used for procedures where the side of the body is important. For a knee surgery, Laterality is important. It is not relevant for heart surgery. If the laterality toggle is active, when the article is used for a consent form, the dashboard user will be asked to select the laterality for this patient - left, right or bilateral.
Consentable When active, this article can be added to a consent form. Otherwise, it is just considered as a ‘non-consentable’ information article and can only be sent to a patient as an article.
Active Languages Use this control to add a new language translation to your article. This is quite a big feature, so there is a dedicated section further down this page about languages and translations.
Library Reference Number If your article is part of an internal library with reference or ID numbers, you can use this field to retain the link. This is a general alphanumeric field, so most contents are supported.
Manual Expiry Date A date for when to review this content. This is internal only and not shown to the patient. It does not relate to any other functionality - the article will still remain published and available to patients once this date has passed.
History Tab
This tab shows the current draft version, the current published version and all historically published versions of this article.
Each item has a triple-dot menu with additional functionality. This is discussed throughout this support article.
Draft Tab
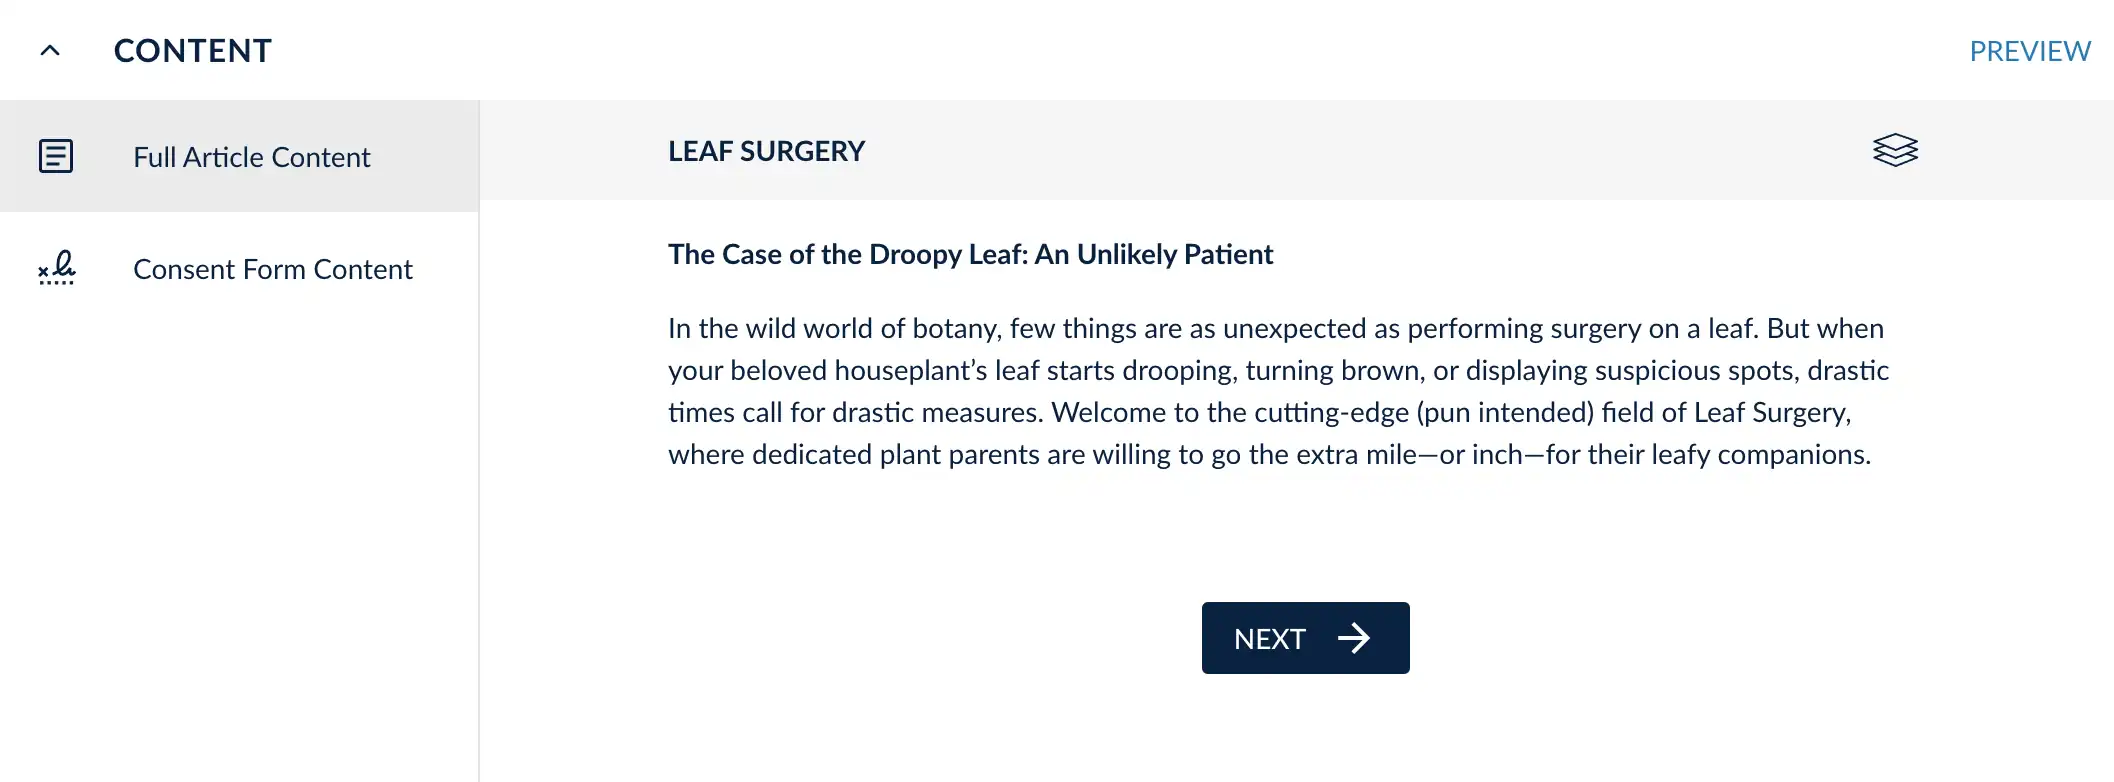
The draft tab is where content editing takes place.
At the top is a field for the Article Name and any manual version number needed.
Then underneath is a list of the pages within the article. The top page will be first in the article and bottom page the last.
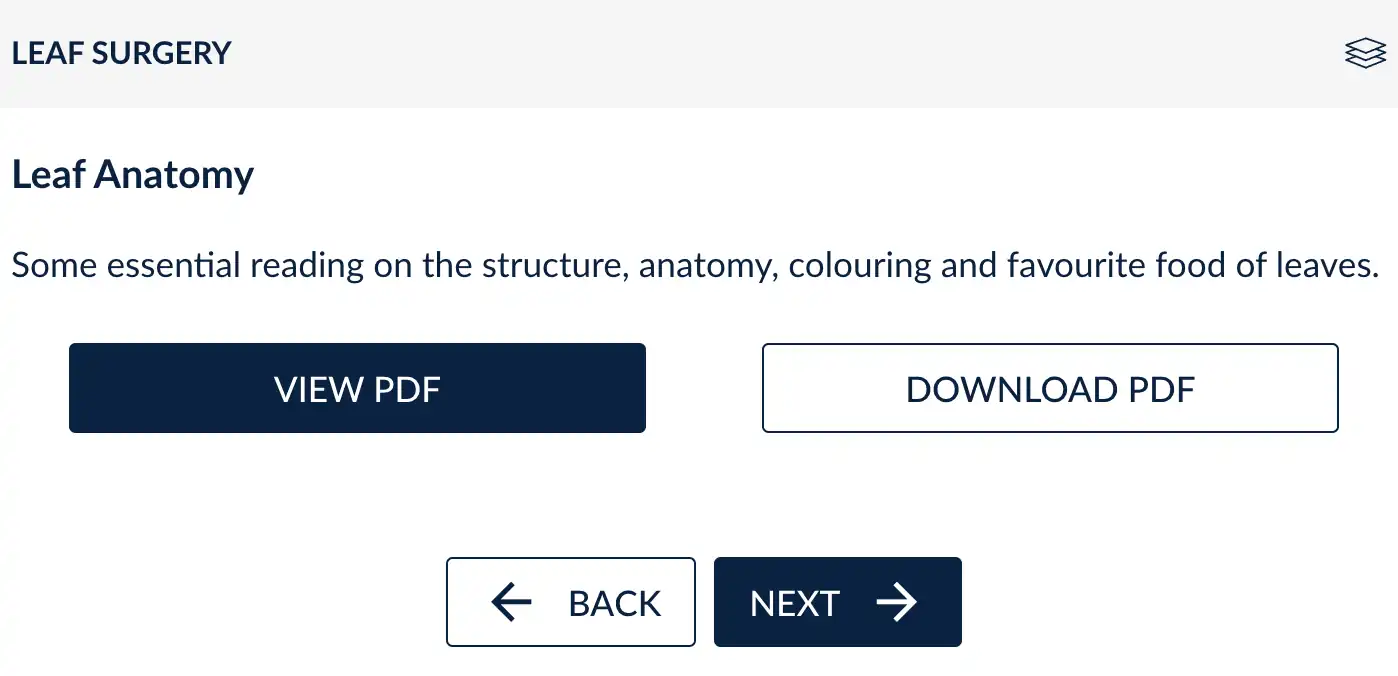
A page in this editor corresponds to a page in the patient’s interface. They have a back/next button to navigate between pages and a chapter select option.
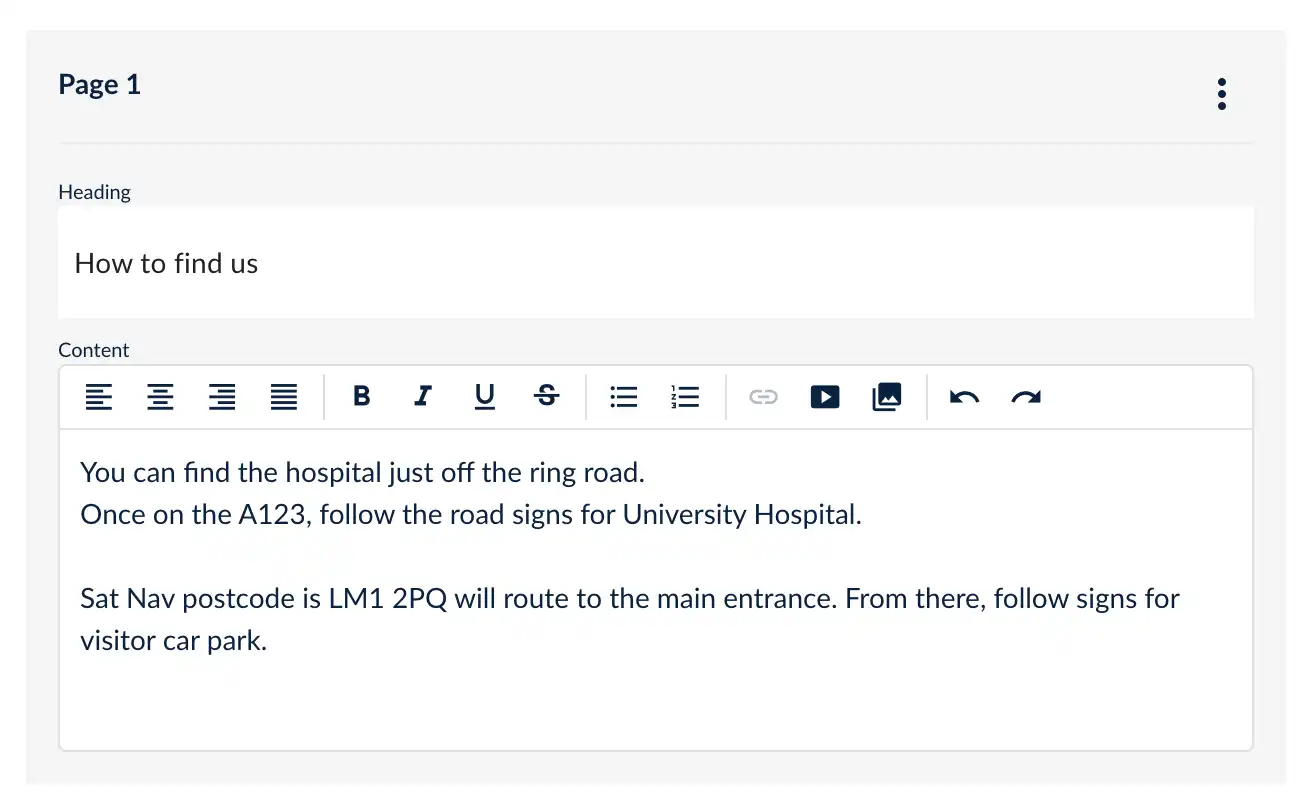
Each page must have a heading, as this is also used as the Chapter/Page name. Then content can be entered into the text editor for the page. It is completely up to the user how much written content is added per page and will likely depend on use case. The usual text editor controls are available, to bold/italic, add links and lists etc.
Add a new page Use the controls at the bottom of the draft tab to add pages to your article.
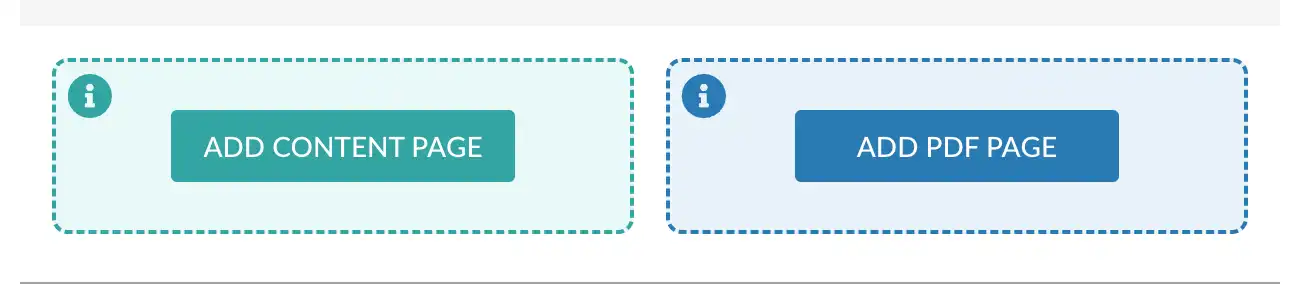
There is a maximum of 25 pages and a single PDF page per article.
A PDF page allows a PDF document to be attached to the page. In the patient interface, there will be view and download buttons on the page, to allow the patient to interact with the document.
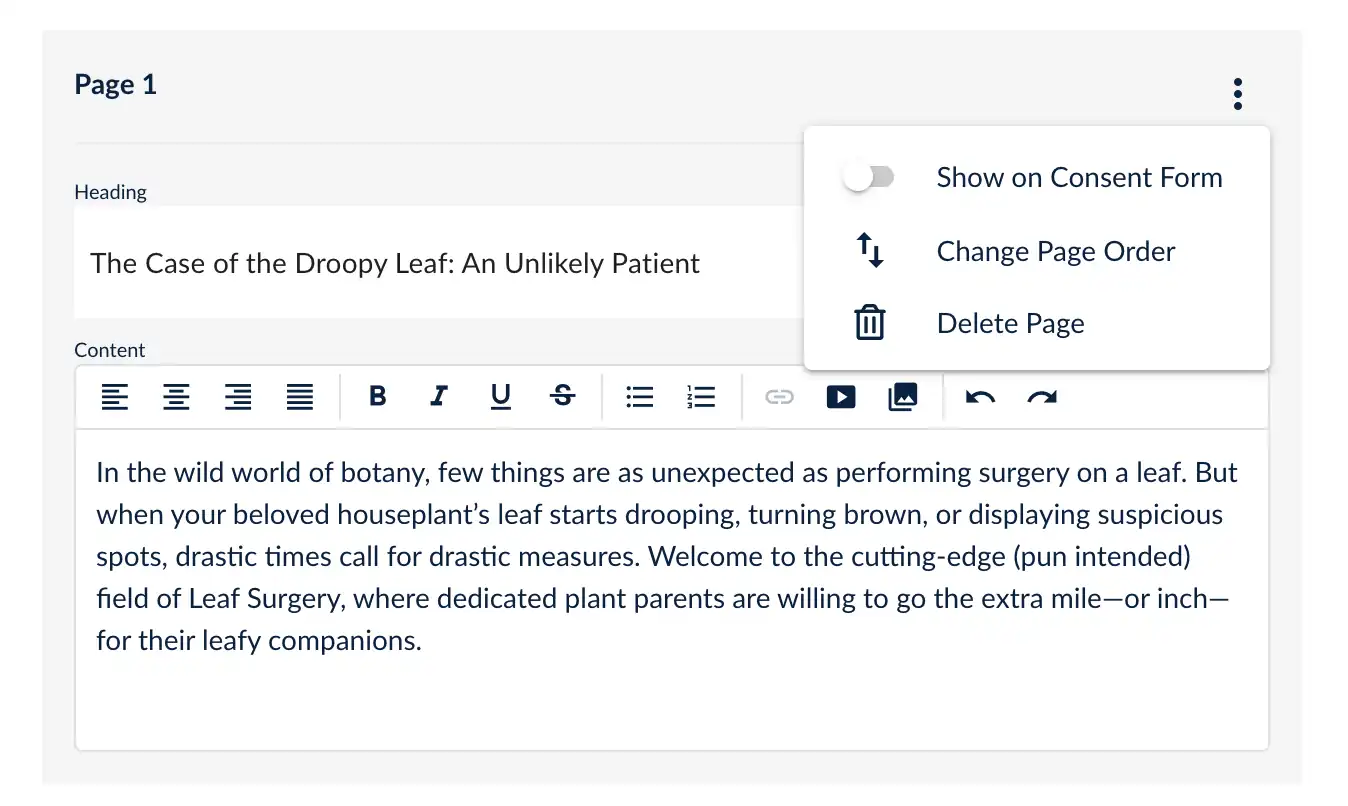
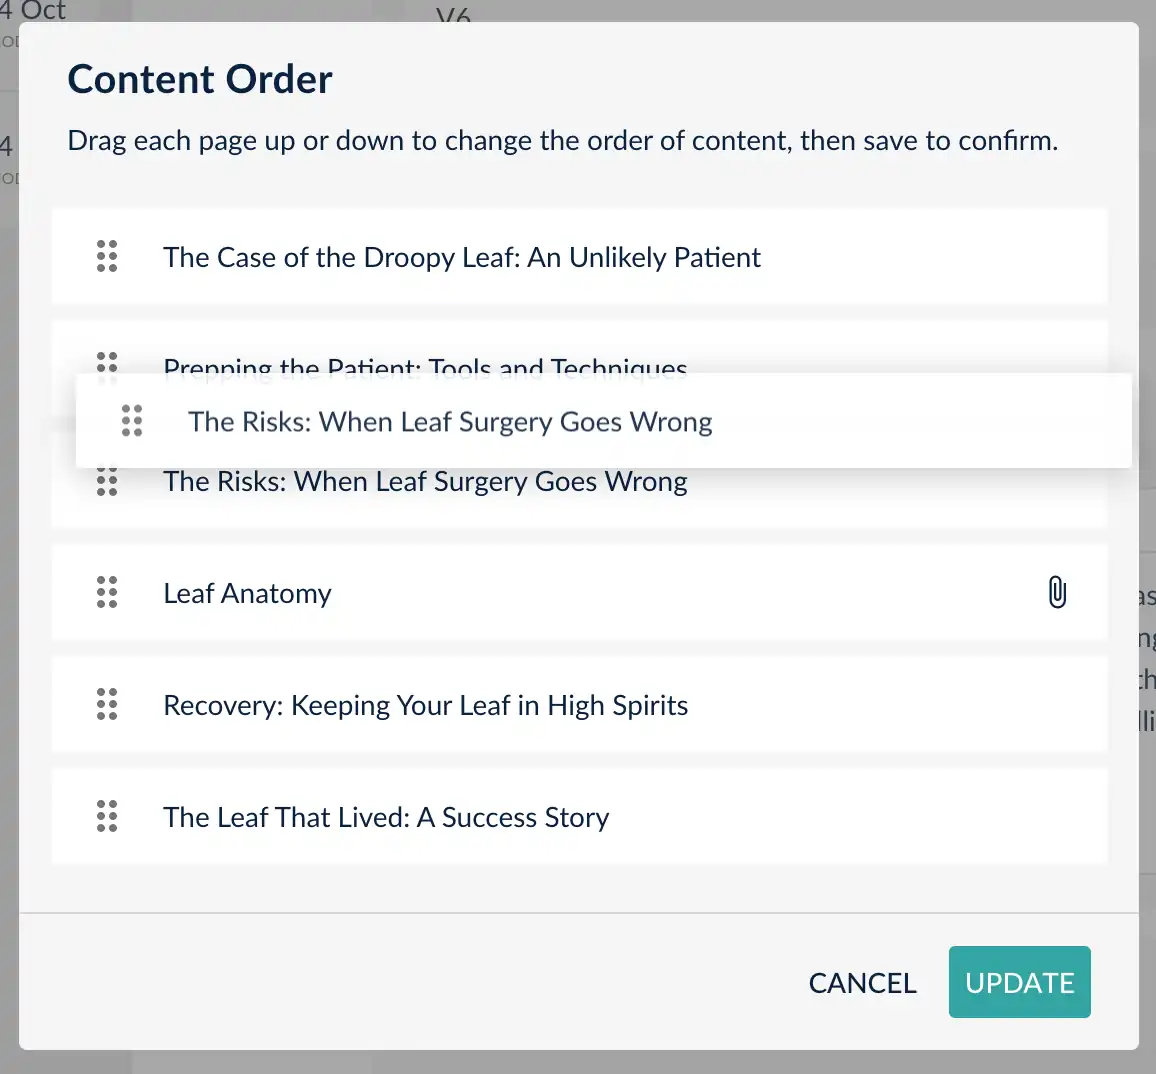
Change Page Order Each Page has a menu, where there are controls for visibility, ordering and the delete button.
Select the Change Page Order option and a screen will open. This allows a page to be dragged up and down to change it’s position within the article. Select UPDATE to save your changes, or CANCEL to discard them.
Images and Videos
In the page editor, images or videos can be added to a page.
Select the image icon from the editor toolbar. A screen will appear, to allow you to upload an image from your computer.
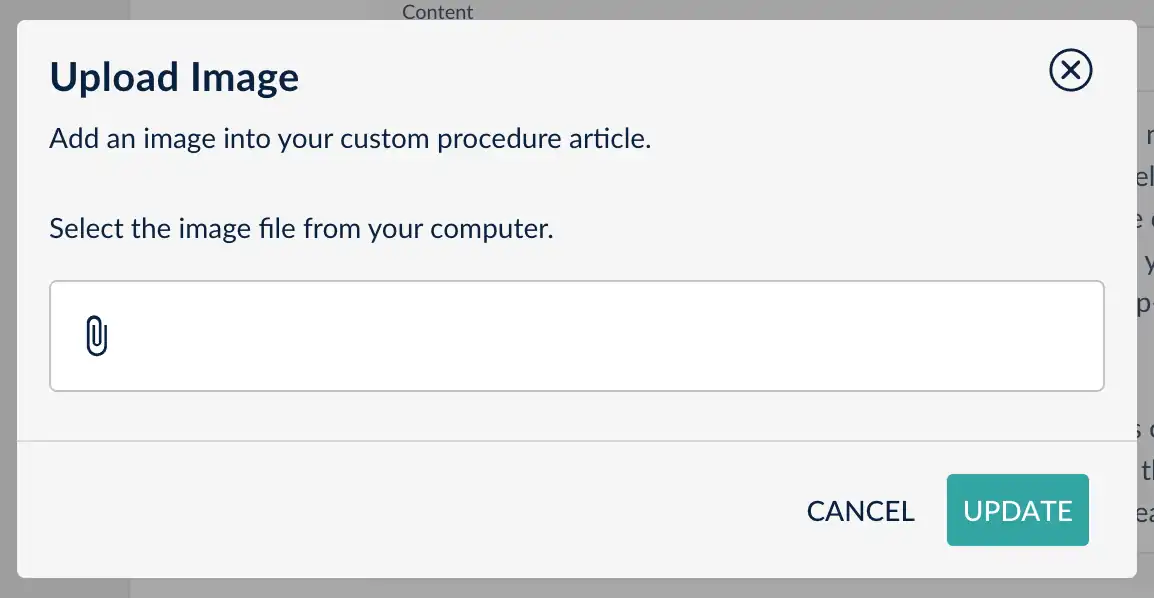
The image will be inserted into the editor. You can select and drag it to place it exactly where required in the flow of the text.
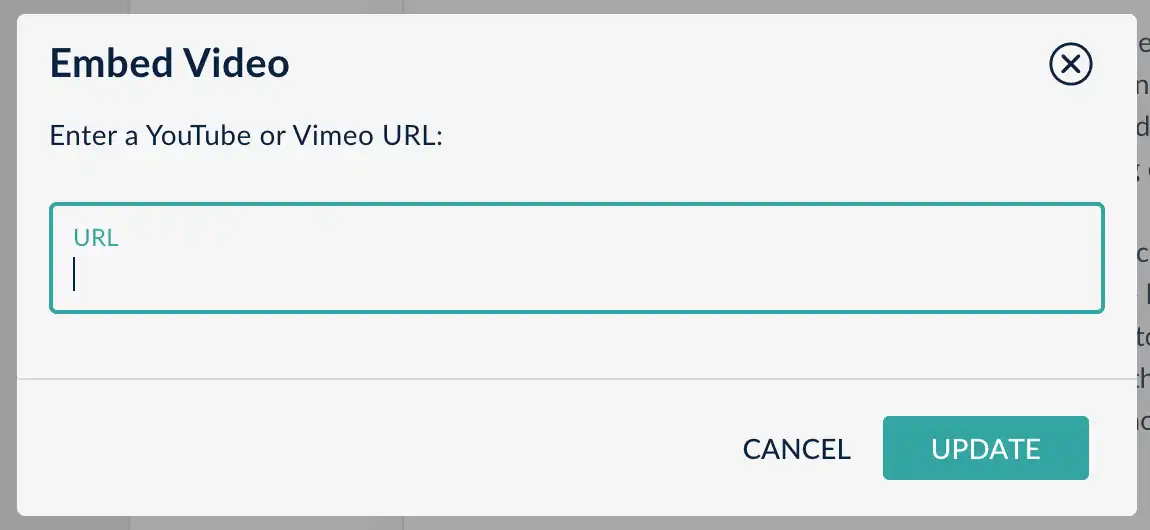
Videos use a similar process. Select the video icon from the editor toolbar and an Embed Video screen appears.
Videos hosted on Vimeo and Youtube are supported. Paste in the video share URL, select UPDATE and the video will be inserted into the article page.
Save & Publish
Making changes to an article is done in the draft tab. You can SAVE progress as frequently as you like. This saves changes to the draft version of your article.
Only when you press publish do these changes get pushed to the live version of the article, seen by patients.
The same is true of the Options tab and name of the article. For example, if you change the the article code and version number, these will only be saved as draft. They are published when the article is published.
Unpublish It is also possible to unpublish a live version of a document. Use this functionality to switch off or deactivate a custom information article. The published version will be pushed back into the draft lane, ready for when you wish to reactivate.
Showing content on the consent form
When a custom information article is sent to a patient to read, all pages are included. However, if the custom information is also used on the consent form, there are controls to define which pages are shown on the consent form.
In the EIDO Library, the benefits, risks and alternatives are pushed onto the consent form. Other info, such as recovery or the procedure process is not considered relevant for the consent form.
The same functionality is offered for custom information article. In each page menu is a toggle switch to “Show on Consent Form”.
For example, the first page of an article might be an introduction, followed by an overview. These are not relevant for the consent form, but the benefits of surgery and alternative options would be. These pages can be activated and will therefore show on the consent form.
Note that the custom information article must also be marked as ‘consentable’ in the Options Tab to show on a consent form.
Translations
Custom Information Articles are fully multi-language compatible. You have complete control over the content of each language.
Start in the Options tab and open the Active Languages list. 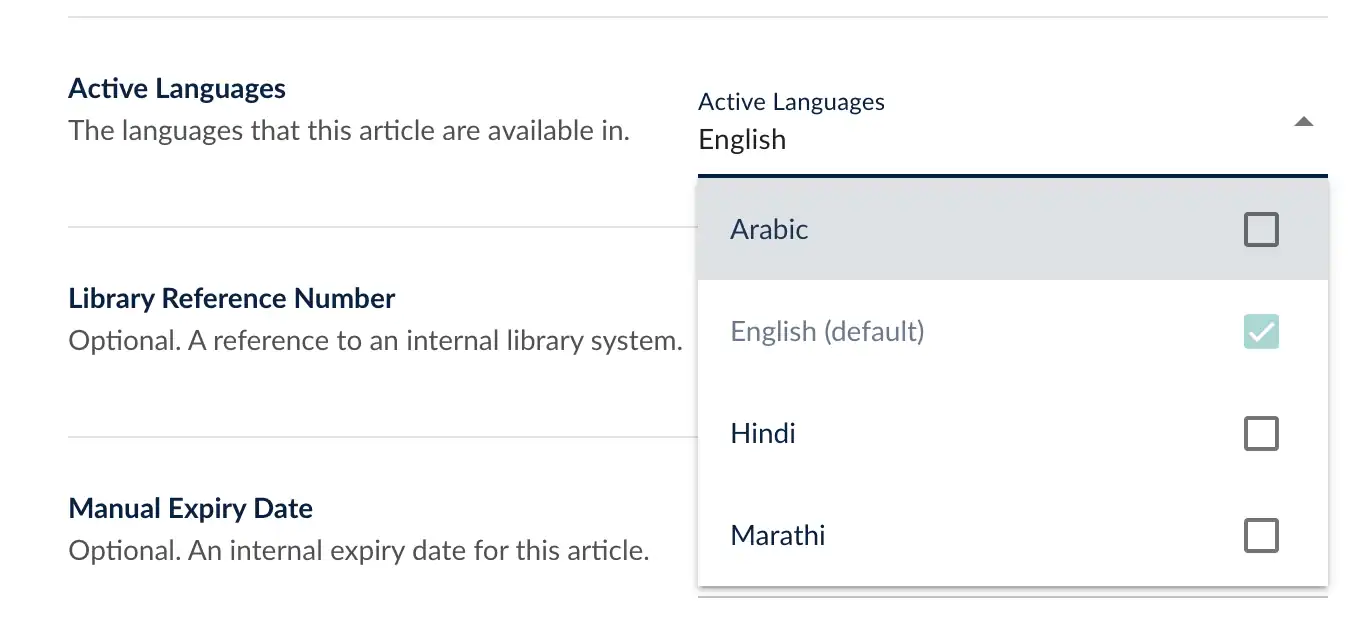
In this example, we are activating the Hindi language for this article, so we toggle the Hindi option on.
Now goto the Draft tab and the language bar will have activated. This allows you to choose the language for the article you are working on.
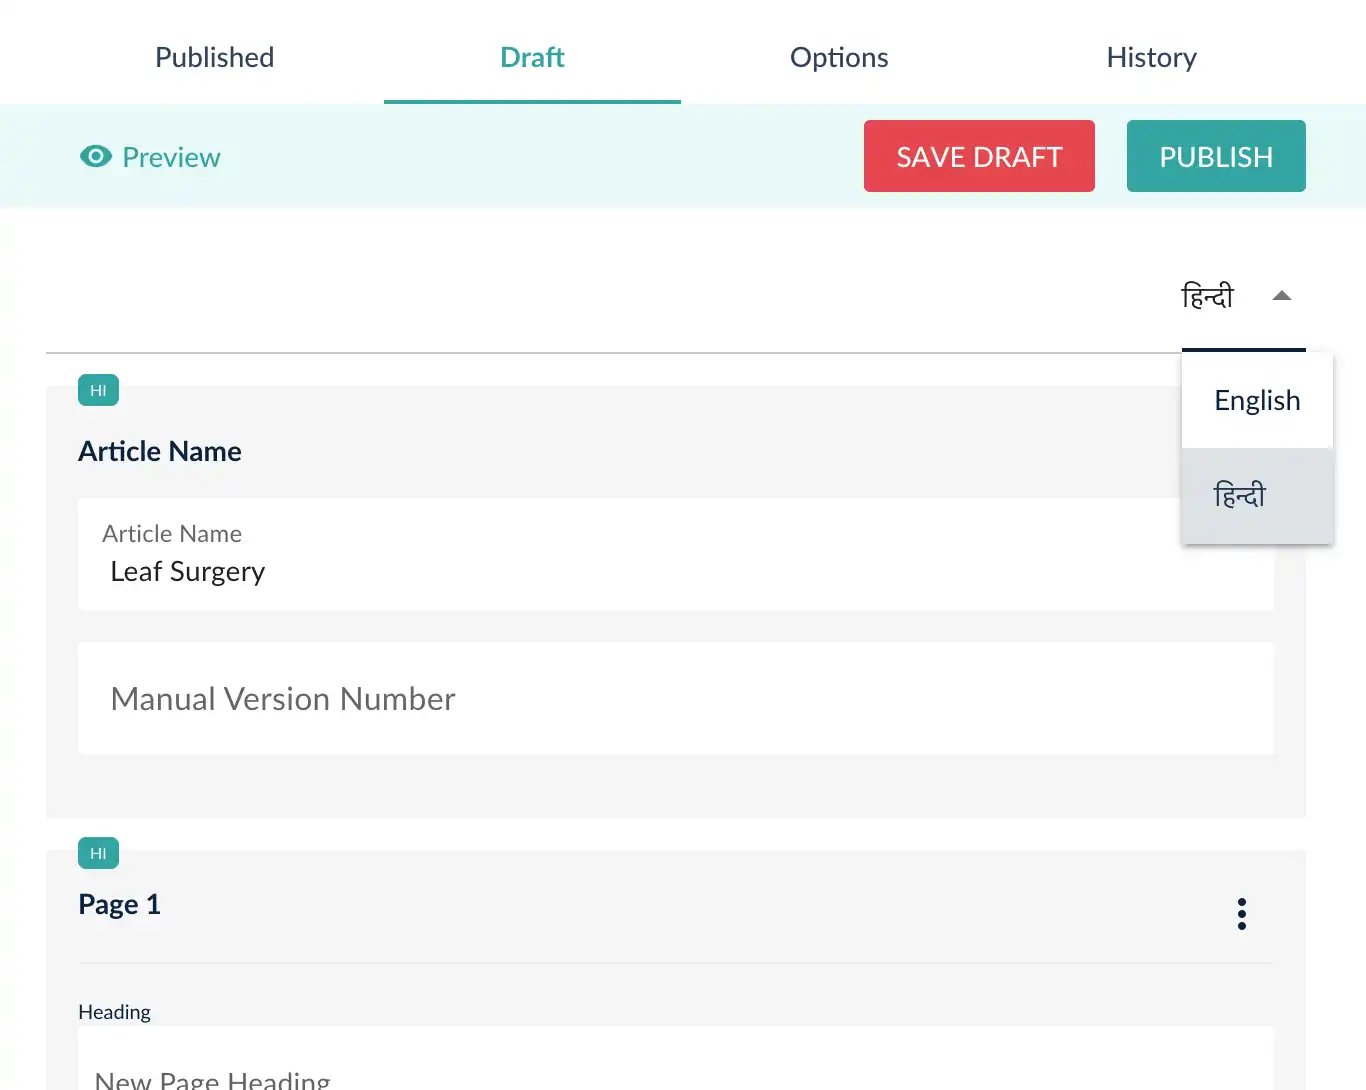
If you scroll down, you will see that there is now just one page in the translation. The page structure of the translation is completely unrelated to the parent english article. i.e. you can have 10 pages in English and 12 pages in Hindi. This choice was made to ensure flexibility in translations and variations for different cultures.
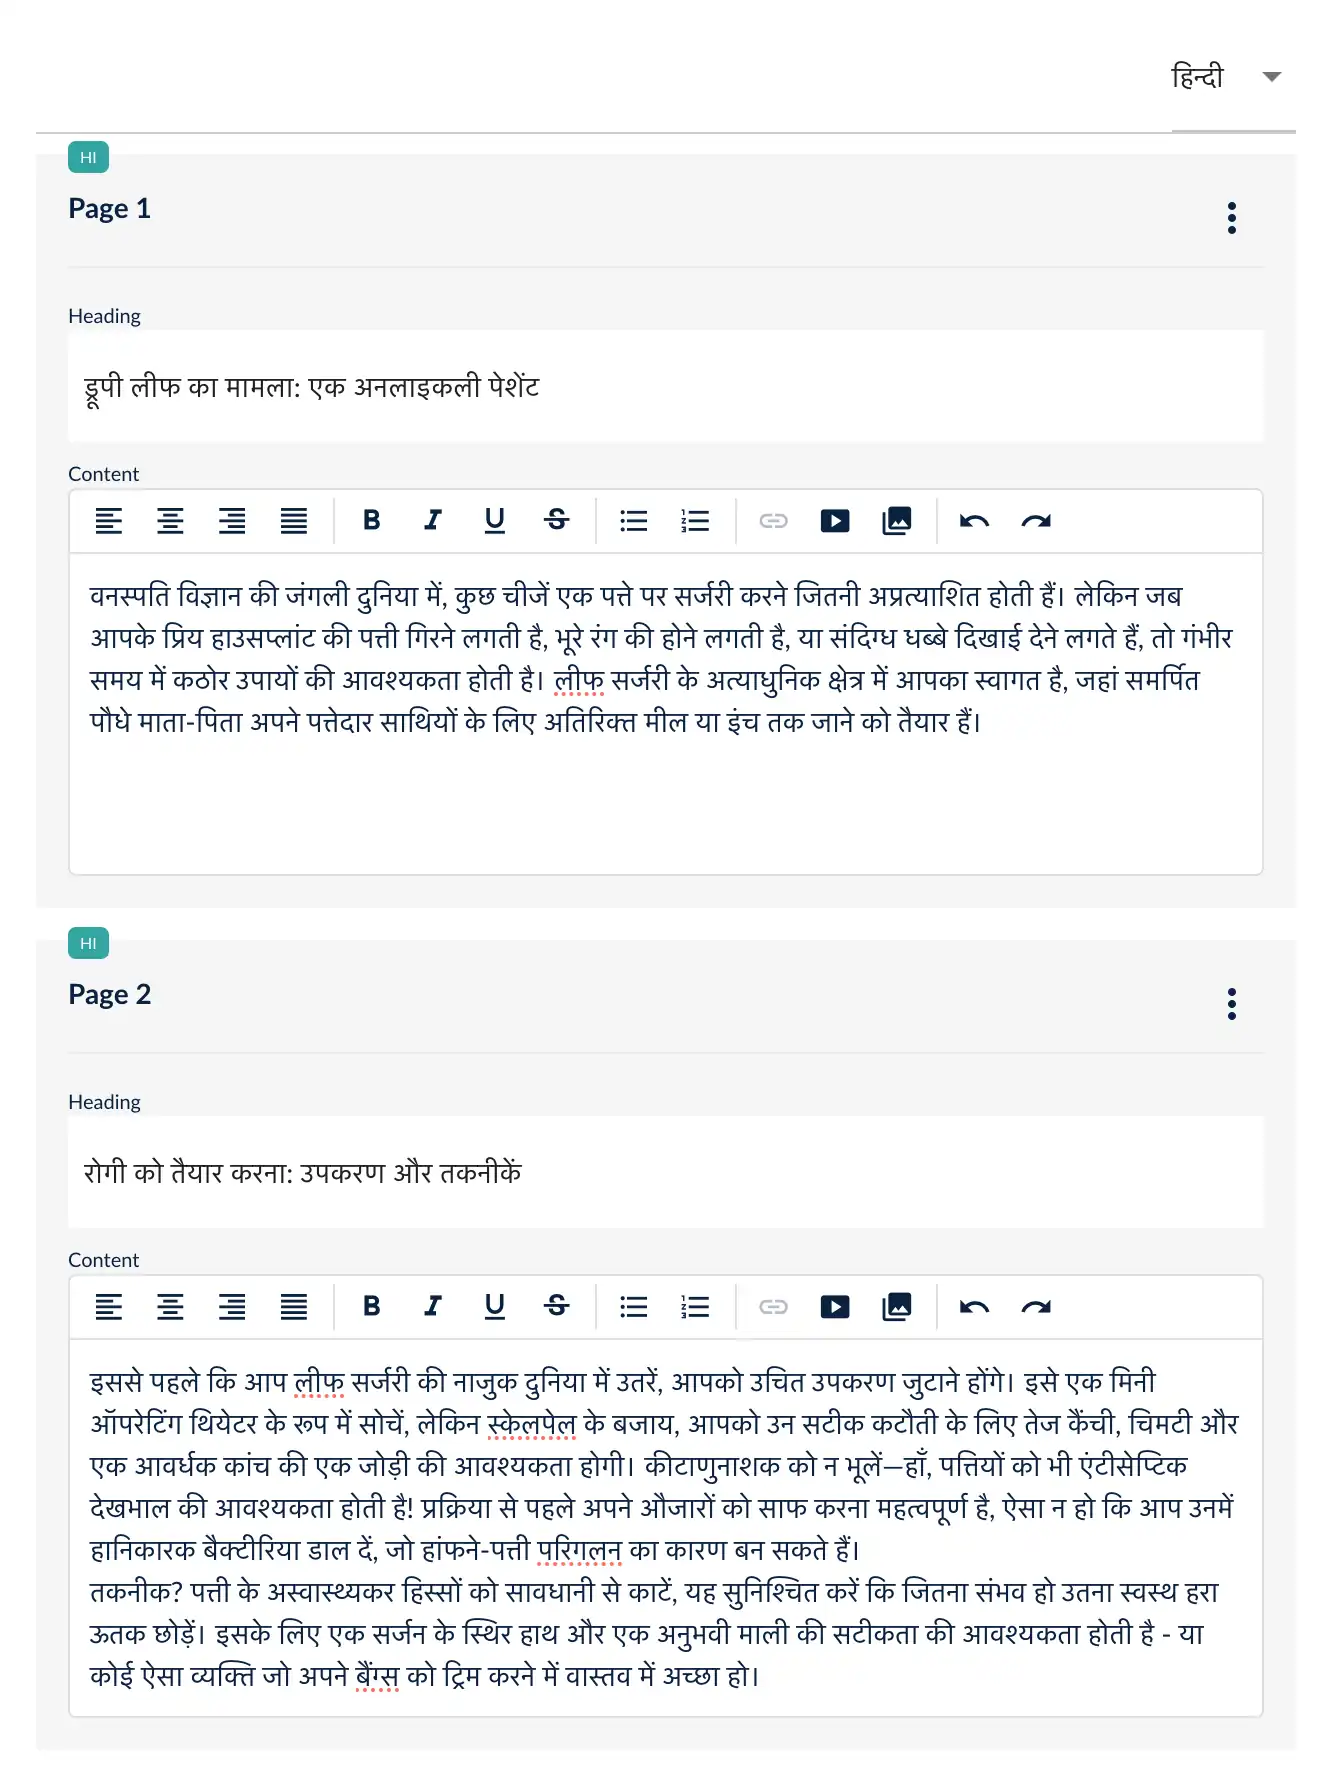
The Hindi content can now be entered. PDFs, images and videos are treated independently, so language-specific versions can be added.
Select SAVE DRAFT at the top and the Hindi version is now saved.
It still is not published.
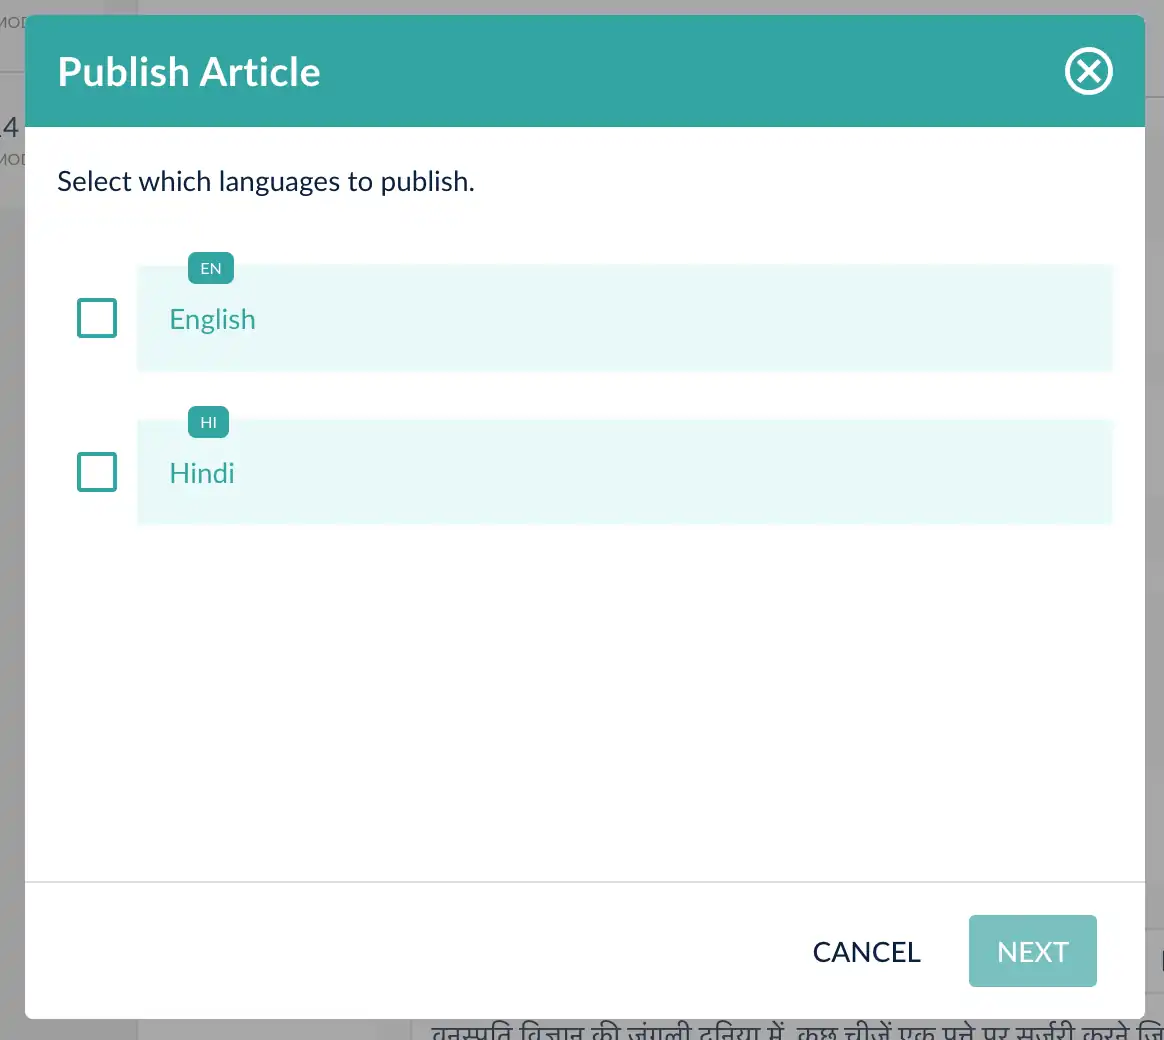
Now when you select the PUBLISH button, a language selector is shown. Choose the languages to publish - we are doing both in this case.
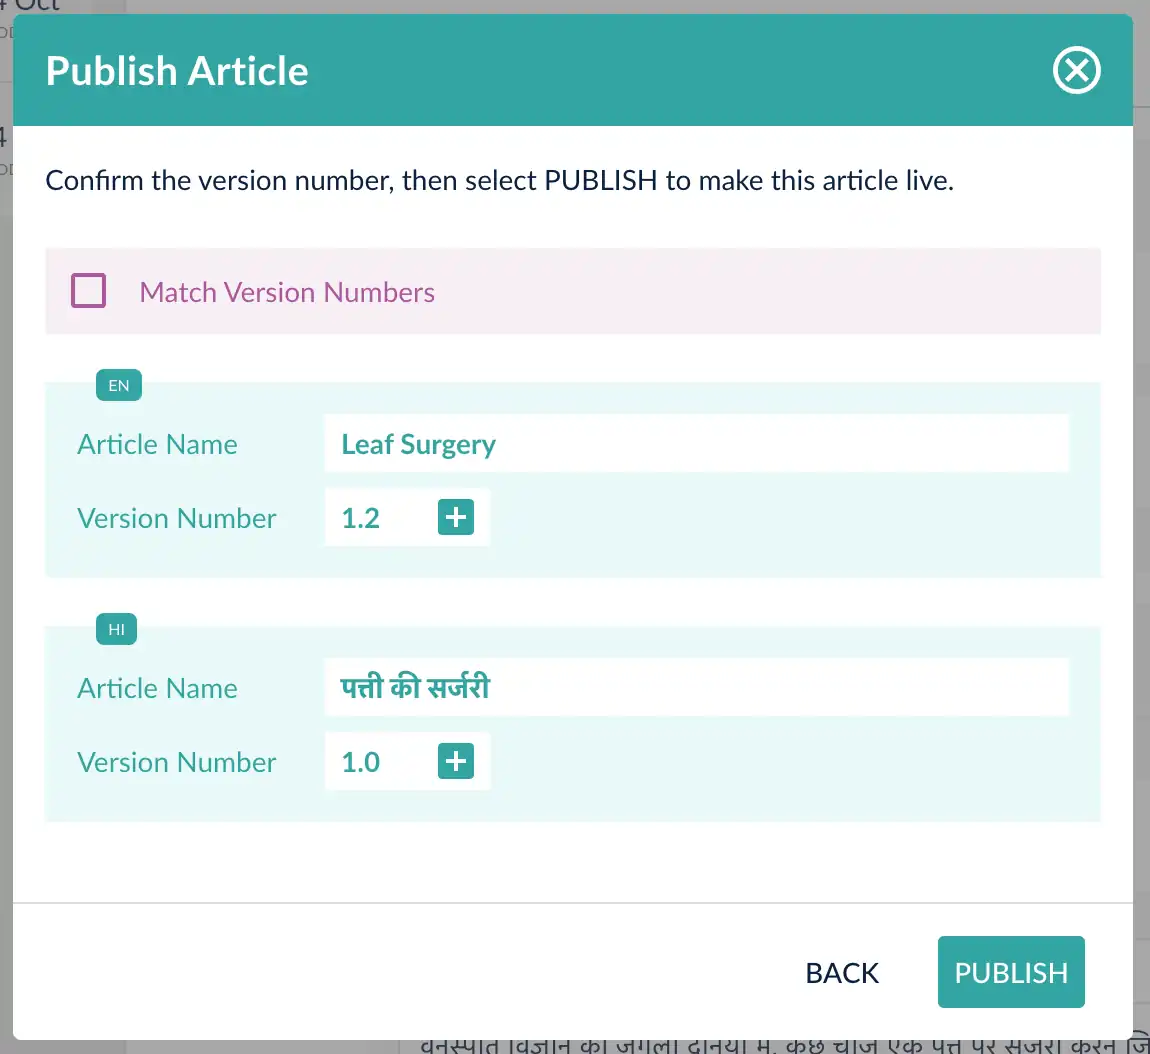
Then on the next screen, we confirm or change the version numbers. There is also an option to match the version numbers. This will choose the highest version number and bump all translations to that number.
Select PUBLISH and your translated version is now live.
Translations of Custom Information Articles are treated in the same way as EIDO articles. The patient interface will detect the browser language or the patient can choose their preferred language.
If you wish to use an external translation service, look at the import and export feature. This would allow you to export a version of the article to file, send this to a translator, then import the translated content to a new language.
Preview
Preview allows you to see the article in the same interface as the patient will. It is possible to preview both a draft and a published version.
In the header, there is a preview button. Select that and a new tab will open with the article in.
Note that when you have multiple translations for your article, the preview respects the current chosen language.
There is a ‘content’ menu, that allows you to switch between full article and consent form content.
Send to a patient
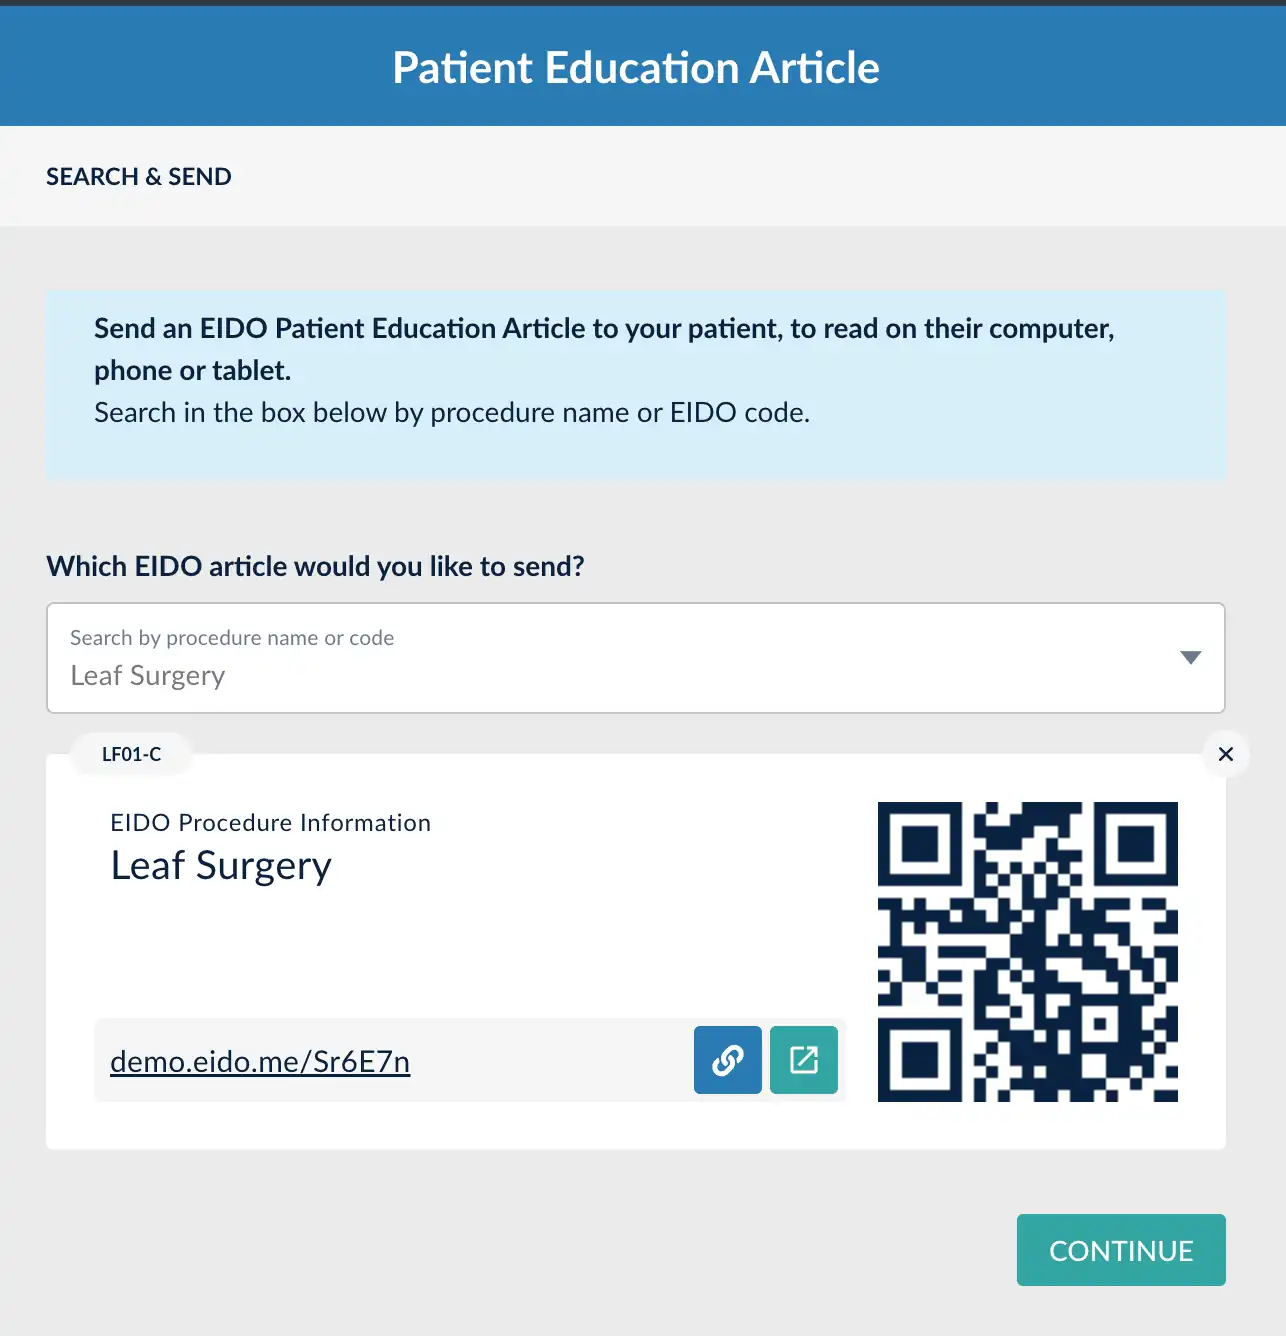
Now your article is published, it can be sent to patients in exactly the same way as an EIDO article.
Goto the Article module and search for your custom information article name, or code.
Or find a patient, then create a new session and add the article.
Import & Export
Any version of your article can be exported to a file. This means the published version, draft version or any historical version of the article. Goto the History tab, find the version you need and use the triple-dot menu to export to file. In the example below, we are exporting the current published version.
A file is downloaded to your computer. This can be stored as a backup, or used to import again.
Importing from file
Import will take the data from your file and push it into the draft version of your article.
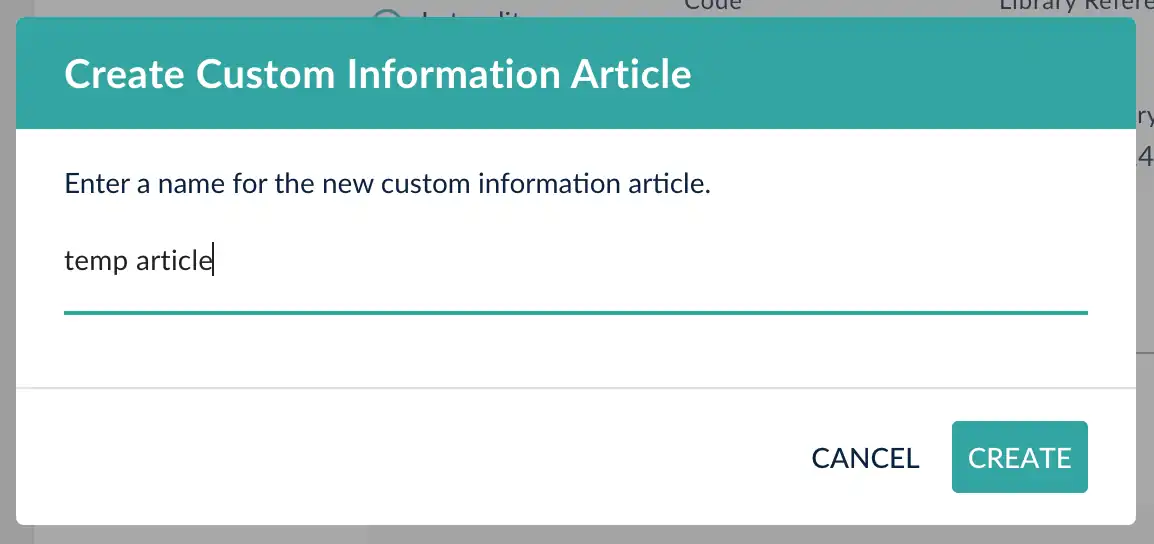
Create a new article and give it a temporary name.
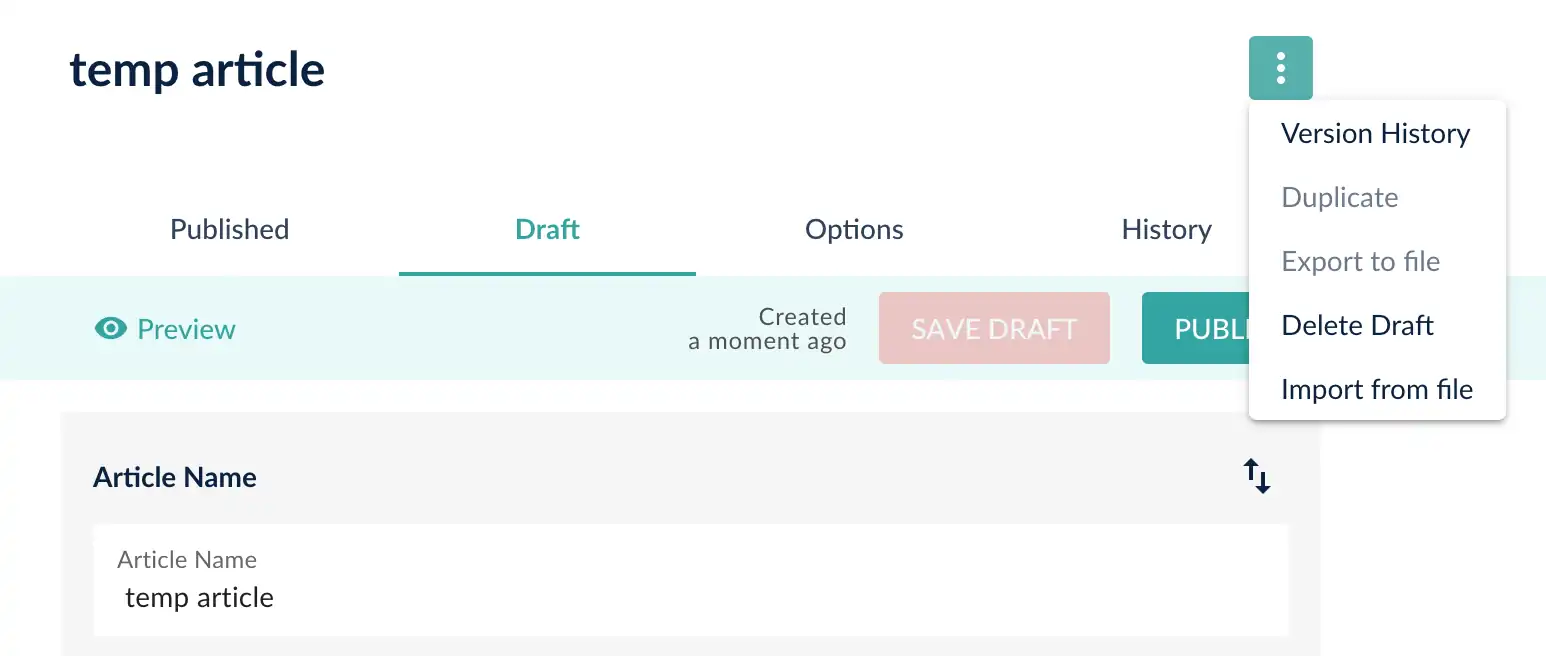
In the header of this temporary article, select menu and ‘Import from file’.
- Select the file from your computer, then press NEXT. Now you see the confirmation screen, which shows what you are importing and where it is going.
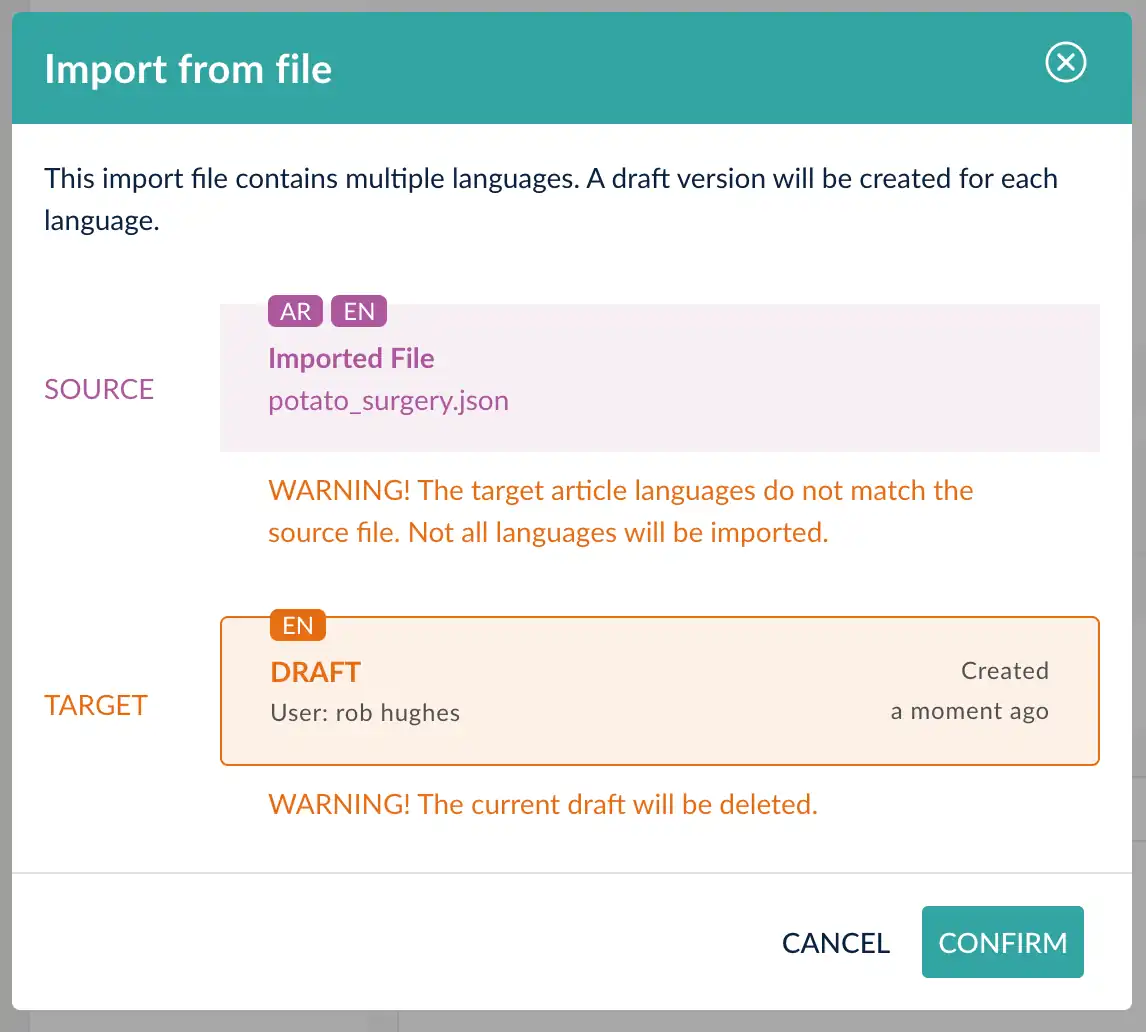
In this case, a warning is shown as the source file has 2 languages and the destination just one. If we want to import both languages, then cancel and add Arabic to the temporary article.
We are happy to just import the english, so we select CONFIRM.
The content from the file is imported to the Draft version and we are taken to the draft tab to check it.
Once you are happy, publish this draft and your imported article is live.
Rollback
If you need to revert back to a previous version of your article, use the export and import to achieve a rollback.
- Assume the current V3.0 is deemed incorrect
- Export the known good version to file e.g. V2.6
- Delete the current draft version
- Import the file into the draft lane
- Publish to V3.1
You have now published the content from V2.6 live and pushed V3.0 back into the historical versions.